Working with events
After an event has been created, there are several ways to modify its characteristics and create other derived events:
Caution: It is possible to create/edit events so that they overlap. Since two overlapping events would attempt to command the device to two different positions at the same time, this is an error condition. (See Logical design check errors.)
Selecting events
A selected event appears with a highlighted green background in the Event view. Selection can be achieved in several ways. First, left clicking on any event will select it. Holding CTRL while selecting additional events will add them to the current selection.
Second, right clicking on an empty portion of the Event View will present an Event Selection menu. This Selection menu allows all events to be selected based on time (left or right of the current mouse position) and it allows events to be selected by track.
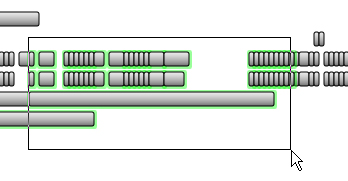
Finally, events may be selected by creating a right-drag selection rectangle. As in much of Windows, by holding down the right mouse button and dragging a rectangle the user can select all events within the drag window.
Scaling events
Once selected, the time span of an event may be easily modified in the Event view. Begin by moving the mouse over the start (left) or stop (right) boundaries of a selected event. The mouse will change to a left/right double-sided arrow. Left click and hold to begin modification. A black outline, similar to that during event creation, will appear showing the location of the newly proposed changes. Release the left mouse button to complete the operation.
Sizing & Scaling Groups of Events
Groups of events can also be sized, or “scaled,” together. A scaling operation is similar to a sizing operation. First, select all the events to be modified. Left click and drag the boundary of any of these selected events (this will be the base event) to perform the scale on all the selected events. There are two modes for scaling: proportional and absolute.
Proportional scaling is the default. Take, for example, two events: one 4 frames long; and, the other, 3 frames long. If both events are selected and the stop (right) edge of the 3 frame event is sized, the two events will be scaled together. Suppose the user adjusts the 3 frame event to make it 6 frames in duration, the 4 frame event will now be scaled to 8 frames in duration. Essentially, since the base event was doubled in duration, all other events (and spaces between events) are doubled in duration.
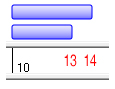
Unscaled example events
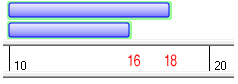
Proportionally Scaled example events
Absolute scaling can be invoked by holding down CTRL during the scaling operation. If the 3 frame event is again used as the base event and increased to 6 frames, the 4 frame event is changed instead to 7 frames. Essentially, since the base event was increased by 3 frames, all other events are increased by 3 frames.
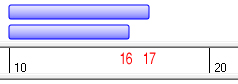
Absolutely scaled example event
Cut, Copy, Paste, & Delete
Characteristic of many Windows applications, events can be cut, copied, and pasted through the Windows clipboard in the Event view. This allows the user not only to edit events within a routine, but also to cut and copy between VSA routines.
To cut, copy, or delete, first select the desired events. Then, by using the Edit menu, the top horizontal toolbar, or by right clicking on one of the selected events, select the desired clipboard operation.
There are two ways to paste the events. Go to the Edit menu and select Paste to paste the events in the left most corner of the screen. Pasting may also be done by right clicking on an empty portion of the Event View. Several paste operations are available:
Paste Here (preserve tracks, preserve time)The events will be copied to the same track and same times as the original events.Paste Here (shift tracks, shift time)The events will be shifted in time so the start time of the first event matches the mouse position. The events will also be shifted by a number of tracks so that the first event’s track matches the mouse position.Paste Here (preserve tracks, shift time)The events will be shifted in time so the start time of the first event matches the mouse position. The events will be copied to the same track as the original events.Paste Here (shift tracks, preserve time)The events will also be shifted by a number of tracks so that the first event’s track matches the mouse position. The events will be copied to the same times as the original events.
Dragging & Dropping Events
Events can also be dragged to new locations or to other VSA routines in the Event view. Begin by selecting the desired events. Left click and hold in the center of any of the selected events and drag the events to a new location. A black outline will appear, indicating the proposed changes. Release the left mouse button when the events are correctly positioned.
Note: Events always apply to the same track. That is, an event for track 0 cannot be dragged to an event for track 1.
Undo & Redo
The Undo and Redo toolbar buttons and Edit menu items serve as a way to revert to previous versions of the document. After an event has been modified (e.g., annotations, positions, time duration, etc.), the undo option can be used to undo the most recent modification. Then, the redo option can be used to redo the most recently undone modification.
Repeating & Mirroring Events
In automation it is often necessary to repeat the same action(s) or repeat a mirrored version of some action(s). This can easily be done in the Event view.
Repeating Events
For example, say two events, “a” and “b”, (blue) move a servo from position 1 to 9 and then from 9 to 1 again. Furthermore, assume that additional events are also involved in the sequence (e.g., the orange events).
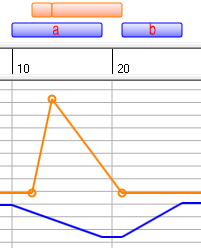
Before Repeating/Mirroring Events
Assume you want to repeat this action more than once. Begin by selecting all the involved events (in this case, all the orange and blue events shown). Next, right click on any of the selected events and choose Mirror & Repeat.... The Mirror & Repeat dialog will appear; choose a “Mirror Style”. Copy to Right/Left will simply copy the events in the indicated direction. The Repeat Count indicates the number of iterations to produce. Finally, the “Frames Between” option determines how many frames will
be inserted between each copy of the selected events.

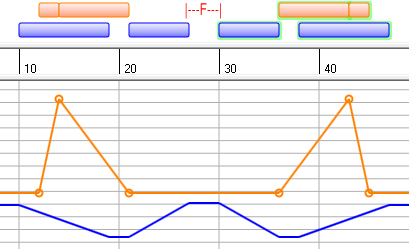
After Repeating Events
The events were copied right with a Repeat Count of two and a Frames Between of five. The resulting start/stop positions are shown in green. Notice that the set was copied twice and no start/stop positions were modified (this is not the case with mirroring). The five “Frames Between” corresponds to the “F” value.
Note: In a group of events to be repeated, the start position of a group must match the stop position (notice how event “a” starts with 1 and event “b” stops with 1). If the values do not match, the start position of subsequent groups will be automatically assigned the stop position of the last group.
Mirroring Events
Mirroring is very similar to Repeating Events and is most useful when a device needs to perform a symmetrically repeating action. For example, if a servo moved from position 1 to 9 and then needs to move from 9 to 1 at the same speed, mirroring could be used. (Note that in the Repeating Events example, mirroring could have been used to create event “b” from event “a” except that they are not of the same duration.)
Begin by selecting all the involved events (in this
case, all the events shown). Next,
right click on any of the selected events and choose Mirror & Repeat.... The Mirror &
Repeat dialog will appear; choose a Mirror Style.
Mirror to Right/Left will mirror the events in the indicated
direction. The Repeat Count
indicates how many times to mirror the selected events.
Finally, the Frames Between option determines how many frames will
be inserted between each repetition of the selected events.
After Mirroring Events
The events were copied right with a Repeat Count of
one and a
Frames Between of five. The
resulting start/stop positions are shown in green. Notice that the set was copied once and start/stop positions
were modified (this is not the case with repeating). Notice that the original events, “a” and “b”, have
been mirrored about a line between the groups.
The five Frames Between corresponds to the “F” value.
Note: Unlike in a group of events to be repeated, mirrored events need not have matching start/stop positions.
WaveMotion Analysis
WaveMotion Analysis can be used to automatically generate events based on the amplitude of the audio file. This feature is particularly useful as a starting point for lip sync animation. Once a set of events have been created with WaveMotion, the events can be quickly fine tuned for the best lip synchronization. You must have at least one audio file associated with the routine to use WaveMotion.
Choose Tools > WaveMotion Analysis..., and the following dialog will be presented:
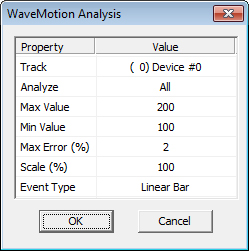
Track Choose the track for which events are to be created.
Analyze Choose the time frame, based on the first and second markers, which should be processed. Events that already exist in this time frame will not be deleted.
Max Value The maximum position value that should be created. By default this will match the track’s default position.
Min Value The minimum position value that should be created. The Linear Bar events that are created will be “scaled” to fit within the maximum and minimum values.
Max Error The maximum error percentage (0% to 100%) defines how closely WaveMotion should attempt to match the servo motion to the audio file’s amplitude. A zero percent maximum error will produce many events that very closely follow the audio file. A higher percentage maximum error will smooth the motion and create fewer, possibly more easily manipulated events.
Scale The scale percentage (-1000% to 1000%) determines how the audio file’s amplitude should be exaggerated or attenuated. A large scale percentage will make smaller amplitudes more noticeable and a smaller value will make large amplitudes more noticeable. If you are creating pulse events for a relay with values of 0 (min) and 1 (max), a scale factor of 100% will create pulses only when the audio is at its loudest. A scale factor of 200% will create pulses whenever the audio is greater than half its loudest.
Event Type Select whether to create Pulse or Linear events (see Event type).
During processing, the WaveMotion software will create events that match the positive portion of the audio file. Note that because audio has a higher frame rate (as high as 44.1kHz) than the servo control (as high as 30Hz), very sharp spikes in the wave file will not be apparent. When events are created, their positions will be scaled to fit within the indicated Maximum and Minimum window. If device motion is too small, try increasing the Maximum and Minimum. The Max Error indicates how closely the events should try to match the audio file. Very small values for Max Error will create many events and match the wave file very closely (although the device may not be able to move fast enough for any apparent motion). Higher values of Max Error will create fewer events and deviate more from the audio file. In general, a value between 2%-15% is recommend. The Scale determines the amplification of the events generated (-100% to 100%). Negative Scale values will reverse the servo’s action relative to the audio file.
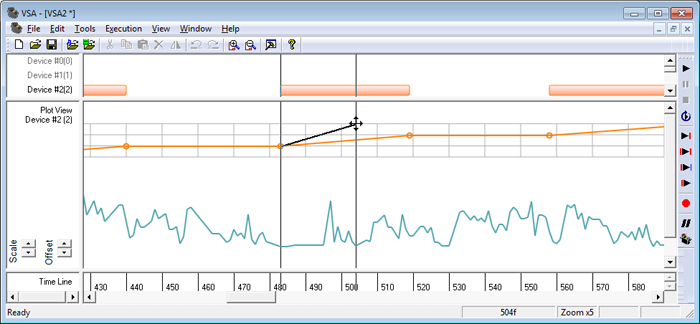
Shown below is an example of the output from the WaveMotion analysis. Notice in the Plot View how the amplitude of the positions approximates the envelope of the positive portion of the audio file.
Track Adjustments
During the creation of a routine, the animatronics hardware may be altered. Servo horns may be repositioned or motors may be wired differently. It may be useful to modify all events with the same transform. Track Adjustment allows events to be scaled or shifted together. For example, if a track’s motor was wired in reverse (so the motor spins in the opposite direction), all events could be transformed with a scale of negative one and an offset shift of zero. The result is that all movements would be reversed together and each event would not need to be modified individually.

Presets There are two predefined presets: Custom and Servo Reverse. A Custom transformation allows you to define your own scale and offset parameters. A Servo Reverse transformation has preset a typical set of parameters need to effectively reverse the orientation of the servo or motor.
Track All events in the selected track will be modified by the transformation.
Scale and Offset All positions in the event will be updated according to the formula:
\[new\_position = scale * old\_position + offset\]The minimum and maximum position values (see Device Settings) will be enforced after the transformation.
Update Settings Certain transformations (e.g., Servo Reversing) often require that the <href> Device’s Settings be updated. Setting this to true will automatically transform the maximum, minimum, and default positions for the track according to the same formula used for event positions (see above).
Analysis (Library Imports)
Event analysis is much like an event “sub-function” in that it allows groups of events to be imported and scaled into another routine. The library file is the file that contains the “importable” events. A library file is the same as a routine file and can be played, edited, and saved exactly like a routine file.
Making a Library
A library is no different from any other routine file. Simply create the desired events. When finished, give all the events you want to be importable the same Annotation. When importing an event, these events will be referenced by their annotation. Save the file.
Importing from a Library
To import events, create a temporary event that defines the duration of the to-be-imported events. This event may be for any servo; all that matters is its time span. This is the base event. Highlight and right click on the event, select “Analysis…”. Select the already created library file in the file selection dialog that appears or by clicking the “Browse…” button. Under “Import a Function,” choose the desired group of events by annotation label.
The chosen events will be imported and scaled to the base event. The start time of the imported group will correspond to the start time of the base event. The stop time of the imported group will correspond to the stop time of the base event.
Editing Events in the Plot View
The start and stop position and start and stop times can be edited in the Plot view. To edit a track, first click anywhere on the track to select it. If you click near several tracks, you will be presented with a menu to choose the track you intend to edit. When a track is selected, a grid will be drawn behind the track, the track’s name will be shown in the left most view, and scale and offset controls will be presented. Additionally, all event start and stop points will be highlighted with a small circle. These circles can be dragged and dropped to new locations.
Once the track is selected:
To move a plot up or down in the window, use the “Offset” control. The offset control does not affect event positions or playback, but does affect where the track is drawn.
To scale a plot, use the “Scale” control. The scale control does not affect event positions or playback, but does affect the how the track is drawn.
To edit a start time, move the mouse near an event’s start time until you see a left/right cursor . Click and drag with the left mouse button to adjust the start time. Note that the start position cannot be changed because it is defined by the most previous event’s stop position.
To edit a stop time, click anywhere on the event where you see a left/right/up/down cursor . Although it is not shown while dragging, adjusting an event’s stop position will also affect the next event’s start position. When you drop the new position, the next event’s start position will be updated.
To create a new event, click and drag anywhere you see an arrow cursor . The event’s start position will be where you start dragging, and the stop position will be where you stop dragging.
To delete an event, drag either the start or stop time such that the event has no duration.
To deselect a track, click anywhere away from the track.
Note: When attempting to edit, zoom in as much as possible. The start and stop times will be easier to click and drag.